Fix the bad contrast and blurry display of Kenwood TM-V7E

March 31, 2010 – 11:38 am

I’ve been using the TM-V7 for several years now, and as many of you might know, the display becomes very hard to read after a while. The contrast is very bad, and you have to reconfigure it after the rig gets warmer.

I found a kit on Ebay to fix this problem, but it was quite expensive. After a bit of research I found that this kit just contains some “special LEDs” – What could be so special with those LEDs?

I disassembled the display to analyze how the lighting works, and found 4 blue LEDs behind the LCD. Those LEDs are supposed to be responsible for the bad contrast of the display? First I couldn’t believe this, but as I took a closer look at the LCD it was quite obvious. – Without current the LCD is completely blue and gets transparent when displaying anything. So why are the backlight LEDs blue? The contrast MUST be bad, when illuminating a BLUE display with BLUE LEDs!!

So what I did:

I changed those 4 blue LEDs with 4 ultra bright white LEDs 3mm and it was amazing!!!

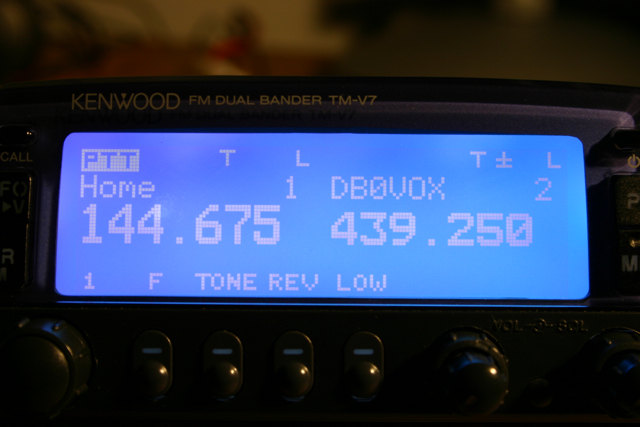
The display is now crystal clear and has a contrast even better when it left the factory. All the numbers/QRGs are displayed in pure white and the rest of the display comes in a warm blue. Great contrast!!
As I used LEDs with 6800mcd the display is much brighter than before. You can read it even in direct sunlight. Great improvement and modification!
The only thing this mod can’t optimize is that you have to recalibrate the contrast from time to time as the rig gets warmer/colder, but this comes from the LCD itself.

I hope I could help some OMs to fix their TM-V7 with this short story.

Let me know about your experiences!

vy 73, DL8NBD

Here are 2 pictures after the modification (unfortunately I missed to take pictures from before…):
It’s difficult to get this on picture, but in real it definitely looks nice!

Update/Tips:

Take care of the LCD while disassembling the display. The LCD has to be flipped over
and it is only mounted by the ribbon cable. If this is broken you end up with a brick.
Also be careful of scratches on the LCD - it is very weak.

The LEDs must be placed and soldered very carefully. Also the length of
the wires must be exactly like the old ones in order to fit exactly under
that plastic light guide. You should use the old LEDs as a master to
bend the wires correctly. But take care of the correct polarity,
this can be missed very easy.
If you need to change the contrast settings after the mod and the range
from 1 - 16 in the menu is not enough/proper you will find a small potentiometer
on the back of the display's circuit board (there is only one). Use this
to change the contrast to your needs. Just set the contrast to 8 in the menu
and then turn the potentiometer to set the best possible contrast.

If you have any further questions feel free to ask!

Adjusting S-Meter settings of Kenwood TM-V7E

October 10, 2008 – 1:47 pm

I bought the Dual-Band Transceiver TM-V7E and recognized that the s-meter shows only 5 of 7 lights when i was testing with a handheld on the same frequency close to the Kenwood. So i decided to adjust these settings according to the service-manual.

First this was a little confusing, but when you read this manual 3 times you’ll get it. So first you have to “build” the so-called “service-jig”. This is only short-circuiting pin 3 and 6 of the data-terminal in front of the transceiver. I used a small piece of wire that i bended around and putted in.

Next you have to press the “F-Key” and “TONE” simultaneously while powering on the transceiver. It needs an “ALL RESET” and after that you’re in the adjustment menu.

Jump to settings 4-1 for VHF low signal adjustment of the s-meter (for UHF see the service manual). According to the service manual you now need a signal generator to set these things up correctly. Unfortunately i don’t have a signal generator, so is tricked around a little. -> Unplug any antenna of the TM-V7 and use a handheld with very low output power with also no antenna attached. (I used a Yaesu VX-1R) Now hold the handheld about 1m off the TM-V7 and push the PTT. If you don’t see any s-meter lights on put the handheld a little closer to the antenna jack. If you now see some lights on, turn the ENC knob counterclockwise to reduce the settings of the s-meter threshold. (to increase – guess what ;-) )

At this point I was confused again – you don’t see any changes while turning the ENC knob – you have to turn it, and then press ENT to use these settings. (be careful, it will skip to the next step after pressing ENT – so you’re at 4-2 now! – Go back if you need to adjust more!)

Repeat this step for the VHF high-signal settings until you think the s-meter should do it’s job again. – I know this is not an accurate setup of the s-meter, but it might help some OMs to correct these settings for “home-use”. I had to repeat these steps a few times, until it was satisfying.

Let me know about your experience of adjusting some minor things like the s-meter of the TM-V7E.
Maybe you have some tips for me too. :-)

best 73s – DL8NBD

Mailserver Informationen für Benutzer auf diesem System

September 2, 2008 – 3:16 pm

Da sich auf meinem Server mittlerweile doch schon eine ordentliche Anzahl an Mailusern befindet, hier eine Kurzanleitung zur Benutzung von Mailclient/Webmail etc…

  1. Webmail
    Der Zugriff aufs Webmail-Portal ist für jeden Benutzer möglich.
    Hierzu bitte folgenden Link verwenden: Webmail-Login
    Fehlermeldungen des Browsers wegen SSL-Zertifikatsproblemen bitte einfach mit “OK” bestätigen.
  2. IMAP
    Die von mir empfohlene Variante ist die Benutzung eines Mailclients unter Verwendung des IMAP-Protokolls
    Hierbei bleiben alle Emails auf dem Server, ohne sie abzurufen oder zu löschen. Es ist somit möglich Emails mit dem Mailclient (Outlook,Thunderbird etc.) oder dem Webmail-Frontend zu lesen, zu bearbeiten, in Ordner zu verschieben usw… – Diese Änderungen werden auf dem Server vorgenommen, so dass es somit möglich ist, das Postfach von überall zu erreichen.
  3. POP3
    Es ist nach wie vor möglich die Mails im klassischen Sinne “abzurufen”. Hierbei verbindet sich der Mailclient (Outlook etc…) auf den Mailserver, und lädt dann die dort vorhanden Mails herunter. Danach sind diese in der Regel auf dem Server gelöscht, und können dort auch nicht wieder hergestellt werden. – Nachteil ist, dass man somit immer ein leeres Webmail vorfinden wird, sollte man den Rechner zu Hause mal gerade nicht zur Hand haben.

Einstellungen die am Client vorzunehmen sind:

Posteingangsserver (IMAP/POP3): mail.jucktmich.net

Port: 110 (POP3) oder 995 (POP3s)

143 (IMAP oder 993 (IMAPs)

Benutzername = vollständige Emailadresse (user@example.org)

Postausgangsserver: mail.jucktmich.net

Port: 25

Benutzerautentifizierung muss aktiviert sein und man muss TLS(SSL) aktivieren.

Sollte es Unklarheiten bzgl. der Konfiguration geben, stehe ich gerne zur Verfügung.

Gruss,

Benny

Apple Mail.app error with Dovecot IMAP (Debian 4.0 etch)

July 15, 2008 – 5:36 pm

As I think many users may have the same problem using Apple’s Mail App to connect their IMAP Mailboxes, I decided to share my experience. (now in english ;-) )

When I tried to create new Mailboxes/Folders in Dovecot IMAP (Debian etch 1.0.rc15-2etch4) I came along with the following error:

“Mailbox Creation Failed” – The IMAP command “CREATE” failed with server error: Unknown namespace…

Even my existing Folders did now longer exist – They were still in the .maildir, but not visually shown in Apple Mail.app.

I tried to change the IMAP Prefix in the preferences, but it still didn’t work.

My solution for this problem is, to install the most recent version of Dovecot IMAP using backports.org

First, uninstall all existing Dovecot Packages

Insert this to your /etc/apt/sources.list

deb http://www.backports.org/debian etch-backports main contrib non-free

then install Version 1.0.13-1~bpo40+1 (this one worked fine)

apt-get update
apt-get -t etch-backports install dovecot-imapd dovecot-pop3d

Now try again – Have fun ;-)

Update:
For those of you who need the part of my dovecot.conf, here you go:

namespace private {
separator = .
prefix = INBOX.
inbox = yes
}

Alter Server down

July 14, 2008 – 2:34 pm

Habe den alten Server nun endlich runtergefahren.

Nach knapp 2 Jahren Uptime, hat er seinen Dienst getan:

srv01 =14:32= [~]> uptime
14:32:09 up 607 days, 21:02,  2 users,  load average: 0.00, 0.00, 0.00
srv01 =14:32= [~]> init 0
srv01 =14:32= [~]> Connection to 213.95.21.110 closed by remote host.
Connection to 213.95.21.110 closed.

Fall jemand Interesse an einer alten Sun Ultra 10 mit 512MB RAM hat, moege er sich bei mir melden… Guenstig abzugeben. :-)

RBLs auf mail.jucktmich.net

June 24, 2008 – 1:18 pm

Die Verwendung von RBLs scheint wirklich einiges zu bringen:

4353 unique senders filtered:
displaying 5000 of 10488 rejected by subscription
5560 - zen.spamhaus.org (53%)
4914 - bl.spamcop.net (46%)
14 - ix.dnsbl.manitu.net (0%)
32 user unknowns

Werde nun mal sehen, ob die User Mails vermissen bzw. die Logs im Auge behalten.

Apple Mail.app – Problem behoben

June 22, 2008 – 2:18 pm

Nun konnte ich den Fehler beheben, dass im Apple Mailer keine IMAP Folder angezeigt werden, und auch keine neuen angelegt werden koennen.

Die Version von Dovecot, die mit Debian Etch/stable mitkommt scheint zu alt zu sein.

Das Problem liess sich mit den Backports Paketen loesen.

Hierzu einfach folgendes in die /etc/apt/sources.list eintragen:

deb http://www.backports.org/debian etch-backports main contrib non-free

Danach:

apt-get update
apt-get -t etch-backports install dovecot-imapd dovecot-pop3d

Und siehe da, der Apple Mailer funktioniert nun wie gewuenscht! Juhu ;-)

Apple Mail.app und Dovecot IMAP

June 22, 2008 – 3:04 am

Nachdem ich meine mittlerweile schon sehr langsame und “vergammelte” Sun Ultra10 durch neue Hardware ersetzt habe, habe ich auch den bisher verwendeten IMAP Server Courier gegen Dovecot ersetzt. Dieser performed deutlich besser als der alte, jedoch mit einem entscheidenden Problem:

Apple Mail.app kommt anscheinend nicht mit den IMAP Foldern (Mailboxes) zurecht, und zeigt diese erst garnicht an. Auch das Anlegen von neuen Mailboxen funktioniert leider nicht wie gewuenscht. Ich bin im Moment noch am Fehler suchen, und mir den Arm “aus-google-n”.

Folgende Fehlermeldung kommt beim Anlegen der Mailboxes:

Mailserver Config

June 22, 2008 – 2:53 am

Da ich noch immer nicht müde bin, habe ich noch ein wenig an meinem Mailserver-Setup geschraubt.

Einige meiner User (nein, ich schreibe jetzt nicht wer… ;-) ) verwenden leider sogenannte Catch-All Mailadressen. Sozusagen *@domain.com. Dies ist zwar nett, wenn man gerne ein volles Spam-Portfach haben moechte, jedoch nicht so wirklich prickelnd fuer den Admin des Servers.

Also habe ich mir mal angesehen, wie man diverse Blacklists in den Postfix MTA integriert, damit einschlaegige Spam-Mails gar nicht erst angenommen werden, sondern direkt rejected werden.

Hierzu muss man folgendes in der main.cf von postfix eintragen:

smtpd_client_restrictions =
    permit_mynetworks
    permit_sasl_authenticated
    reject_unauth_pipelining
    reject_rbl_client bl.spamcop.net
    reject_rbl_client dynablock.njabl.org
    reject_rbl_client zen.spamhaus.org
    reject_rbl_client list.dsbl.org
    check_policy_service inet:127.0.0.1:60000

Ein Blick in die Logfiles zeigt, dass es prima funktioniert:

Jun 22 02:48:01 srv01 postfix/smtpd[3718]: NOQUEUE: reject: RCPT from
cable201-232-161-135.epm.net.co[201.232.161.135]: 554 5.7.1 Service unavailable;
Client host [201.232.161.135] blocked using bl.spamcop.net; Blocked - see
http://www.spamcop.net/bl.shtml?201.232.161.135; from=

Als weiteres Feature betreibe ich nun auch Greylisting mit postgrey und hoffe so den Muell effektiv draussen zu lassen. Allerdings werde ich wohl mal sehen muessen, ob das ordentlich taugt, da somit Mails mit ca 5 Minuten Verzoegerung erst in der Inbox landen werden. – Ich warte mal auf Beschwerden…

Wie man sieht, klappt das schonmal ganz prima: